Senin, 14 November 2016

Connecting VMware ESXI Host from Mac with vmware fusion

Helow,
in this post i would like to share about connecting to vmware esxi server using mac address. As dedfault, VMware only give us vmware esxi client for windows platform.

how about the user using mac? actually there are a solution provided by vmware, it is by using vsphere web client. The problems occur for me is, I just switching from window to Mac and have not yet install web client support in esxi server.
For you that has same problem, you can try to follow below step for connecting to esxi server using mac.
1. download vmware fusion, it is free
2. install vmware fusion
3. from vmare fusion, choose File ==> connect to server

4. input your server ip address, username and password

5. you can start managing the host from server library

Happy virtualizing All!!!

Selasa, 26 Juli 2016

warm-up-post - I have a new name

hohohoho, it is very long time not posting in this blog. the latest post was almost two years ago. actually this blog is intended to post what I have learned in college but not from class. But because im no longer in the college (actually still, currenly im taking my master in business management, but i cant do all i want to do like in my bachelor degree L) I will be posting everything i think need to remember.

the other reason to start posting again is because i just gave this blog new name (www.herdi.id) ,but still you can access the old uri on http://for-shares.blogspot.co.id/. hahaha :D

Ok, enough for this warm-up-post, i will be posting another post very soon.

see ya..

Minggu, 12 Januari 2014

Load Balancing Using Httpd2.4 with tomcat instance as Web Server


Load balancing is a computer networking method for distributing workloads across multiple computing resources, such as computers, a computer cluster, network links, central processing units or disk drives. Load balancing aims to optimize resource use, maximize throughput, minimize response time, and avoid overload of any one of the resources. Using multiple components with load balancing instead of a single component may increase reliability through redundancy.


Here is the load balancing scenario in my lab,


  • Apache httpd 2.4 will be use as load Balancer
  • Apache Tomcat 1 will be use as web server 1
  • Apache Tomcat 2 will be use as web server 2


Setting up httpd2.4 as load balancer
Before beginning we have to download the Httpd2.4 that we will use as load balancer. You can download it here.
--> extract it in the specific directory
After that, we will need a connector (mod_jk.so) so Apache httpd2.4 can connect to tomcat instance. You can download it here.
--> copy it to [Apache Installation dir]\modules\ mod_jk.so
The next step is about configuring "httpd.conf" that located in [Apache Installation dir]\ conf\httpd.conf
--> Add this line to that file
here is the slide of my presentation in my college about Load Balancing, download it.
here is the complete project about my load balancing, download it.

Sabtu, 28 Desember 2013

Basic tips for Secure Browsing

1. Never keep same password for different services you use online like gmail , facebook, bank accounts etc.,
2. Use multiple accounts so that you dont get spams in your personal/ official email address.
3. Install good Antivirus and Two way firewall.
4. Use VPN for hiding identity and secure browsing when using internet out of your home.
5. Update your OS, Antivirus, Firewall and Browsers regularly.
6. Install a good spyware & Adware scanner .
7. Never provide personal information openly in public websites. Share your information carefully.
8. Never click on unwanted or suspiicious links. It may be hacking attempt.
9. Change your passwords regularly to increase the security of your daily actiivities.


source: https://www.facebook.com/Trickonics

Rabu, 25 Desember 2013

How to reveal saved asterisk password in the browser without any tool

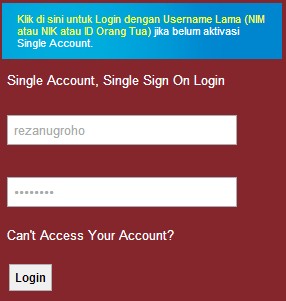
What do you want to do when you open the web browser and then find a page with saved credential like this?
Do you want to know that saved password? :D


well, here is few step to reveal that asterisk password without any tools:
1. Right click on the saved password and then choose inspect element


2. Find text "<input type='password' name='bla bla bla >"
3. Change "type='password'" to "type='text'"

4. Enter
5. Now you can reveal the asterisk password


Next question, how to avoid this happening?
to avoid this happening you can do this things,
1. If there are anyone else that can use your computer, never save your password when your browser ask you to save the password.

2. if you really the one that can use your computer don't forget to lock your computer when you leave it. The simplest way if you can Windows OS you can press (Windows + L) to lock your computer.

-Your awareness is your computer security key- :)

How to know the real extension of a file?

In computer forensic challenge we usually work with a file with no extension like the file in red rectangle below
The next question, how we can know the real extension of those files?
If you want to know the real extension of those files the first thing you can do is check the "file signature" from those files.
what is file signature?
 a file signature is data used to identify or verify the content of a file. In particular, it may refer to:
  • File magic number: bytes within a file used to identify the format of the file; generally a short sequence of bytes (most are 2-4 bytes long) placed at the beginning of the file (wikipedia)
     1 byte = 8 bits = 2 Hex
     2 - 4 bytes = 4-8 hex
to know the "file signature" a file the first thing you can do is check the hex value of that file (because most of file signature is stored as hex value on database),
to do this you can follow this steps:
1. download this tool "HxD Editor"
http://www.softpedia.com/get/Programming/File-Editors/HxD.shtml
2. after download, just install and open it.

3. open the file you want to know the real extension (click menu File --> Open)

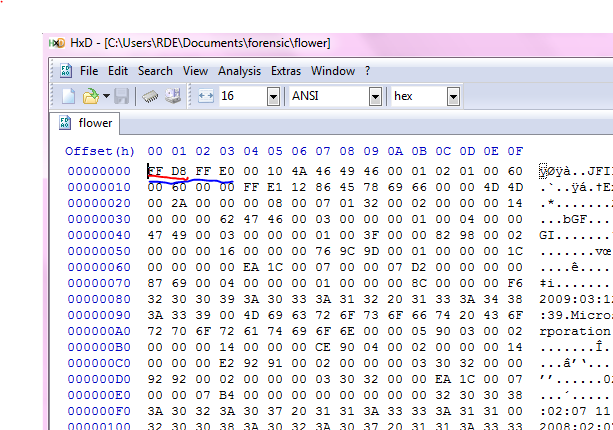
4. copy first 4-8 hex value from HxD Editor
in example we copy first 6 digit Hex value : FF D8 FF
5. find file signature database in internet, like this one
http://en.wikipedia.org/wiki/List_of_file_signatures
the other file signature database:
http://www.garykessler.net/library/file_sigs.html
http://www.filesignatures.net
6. rename the file with real extension

ta daaaa :)
For your exercise please find the right extesion for "Mocca" file :D
this is the file that you can download.


Jumat, 27 September 2013

Tahapan Instalasi Active Directory pada Windows Server 2008 R2

Active Directory adalah layanan directory yang terdapat pada system operasi server. Active Directory terdiri atas basis data dan juga layanan directory. Active Directory menyediakan sarana untuk mengelola identitas dan hubungan yang membentuk organisasi. Active Directory yang ada pada Windows Server 2008 R2 menyediakan berbagai fungsi untuk melakukan konfigurasi yaitu: administarasi system, pengguna (user), group, computer, dan pencarian directori. Active Directory juga memberikan cara untuk mengelola credential untuk mengizinkan pengguna yang sah yang dapat mengakses baik itu perangkat aplikasi maupun data.

Untuk lebih lengkapnya silakan download paper berikut ini :
  1. Paper versi Nunung
  2. Paper versi Herdi

The New Generation of Enterprise Java: Designing for the Next Big Thing

Telah terjadi pergeseran generasi dalam pembuatan java enterprise application. Berawal dari arsitektur monolitik menjadi multiple services yang saling berhubungan dan terdistribusi. Ada 4 Big Things yang dibutuhkan oleh Java Professional dalam melakukan perancangan, yaitu Cloud, Big Data, Agile Development & Operations, dan Failure is an option.

Berikut ini adalah hasil dari review Video Stepen Burton : The New Generation of Enterprise Java.

Untuk lebih lengkapnya silakan download paper berikut ini :
Download Paper versi Nunung atau Download Paper versi Herdi

Minggu, 20 Mei 2012

Configure Cisco 3600 Router with Radius Server

Radius Server 
A protocol or hardware that serves AAA services. AAA services include authentication, authorization and accounting. With AAA we can centralize our network configuration in one place (Radius Server). If we have many router or other device in our topology, we don't need to configure that devices one by one. Just list all username and password that used in network and add it to radius server.
How to make a radius server?
Radius server can be made by nomerous tools, like, windows server, ubuntu, Terminal Access Controller Access-Control System (TACACS) or etc. In this tutorial I will make a radius server by "WinRadius", a lite application that support AAA services.

Requirement to do this tutorial
At least you have this 5 tools:
1. VMware
2. GNS3
3. CISCO C3640 IOS
4. WinXP
5. WinRadius
6. A cup of coffe.. :D
Topology of router and radius server

Steps:
1. Comfigure WinRadius
WinRadius Setting
NAS Secret : Secret key for router


WinRadius Database

WinRadius Test


 2. Setting your computer


If you want to know more about setting up radius server using WinRadius you can watch at this video.. :D

This is the video...
- Video1
- Video2


If you have any qusestion please leave your comment here..

Selasa, 01 Mei 2012

Communication

Communication is the exchange and flow of information and ideas from one person to another; it involves a sender transmitting an idea, information, or feeling to a receiver (U.S. Army, 1983). Effective communication occurs only if the receiver understands the exact information or idea that the sender intended to transmit.

If you want to know more about communication, you can download here.

Kamis, 19 April 2012

VPN in Win 7

VPN Server in Win 7


How VPN woks
VPN or Virtual Private Network is a technology that allow user connect to their private network by public network (internet). With VPN user can easily remote the resource in their local network anywhere, during they connect to the internet. I have article about simple configuration to make VPN server with windows 7. This article is task in one of our subjet in college. If you want to know more how to set up win 7 as VPN server you can download our college task here.

Thanks to:
-Zulfikar Akbar and members


Sabtu, 07 April 2012

- Yahoo Messenger Fun Fact -

Yahoo Messenger (YM)

Yahoo Messenger is one of popular chat engine in Internet.YM is product from Yahoo! Inc. among another products like email (mail.yahoo.com), news (news.yahoo.com) and search engine (search.yahoo.com). YM provides many features like avatar picture, video chatting, emoticon, file transfer and etc. In this article I'll show some fun fact about YM. You can download YM software here.
  1. YM Multiple Log in
    In default yahoo messenger doesn't allow user to log in with multiple ID in one PC. If you already log in yahoo in browser and then log in with yahoo messenger application, your log in session in browser will automatically ended. But don't worry, if you want to log in with many yahoo ID in one computer, I will show some ways to solve in. :D
    - With registry editor:  
       a. Open registry editor (click Start Menu => Run => type regedit and then klik ok)
       b. Find key [HKEY_CURRENT_USER\Software\Yahoo\Pager\Test]
       c. Right click in key Test => choose New => DWORD Value
    DWORD Value
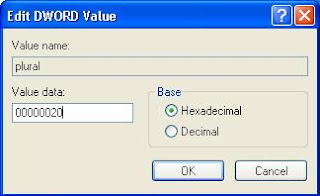
       d. Remove "New nameValue #1" and  change to "plural" (without quote)
    DWORD value
    Change Value Name to plural
     - With YahooGhost Application
        YahooGhost is an application that allow user to configure more feature in Yahoo Messenger like
         remove ads and configure multiple login. You can download Yahoo Ghost here.
    Yahoo Ghost
    And this is the result......
    Yahoo Messenger Multiple Log in

  2. YM Status
    -Link
    Yahoo Messenger supports users to make link in their status. With this link users can promote their blog or website.
    Create YM status with link

    -Emoticon
    Beside support link Yahoo Messenger status also supports emoticon. These are the codes to make emoticon.
    Yahoo Messenger Emoticon

  3. Control Location with YM
    To do this you have to have two yahoo messenger IDs, two computers with at lest one of them equipped with camera and internet line for both. and this is the scenario:
    a. Login with first YM ID in computer with camera in a place where you want to monitor.
    b. Setting your first YM login like this:

    c  Login with second YM ID in another place to monitor the place where you login with first ID

Install SSH Server Ubuntu 10.04 (VMware)

Apa sih SSH?
SSH atau Secure Shell adalah sebuah service dari sebuah sistem operasi yang memungkinkan user dapat melakukan remote terhadap sistem operasi itu melalui jaringan internet / lokal. SSH merupakan perbaikan dari telnet, dimana pada telnet tidak ada enkripsi saat dilakukan pertukaran data sehingga data yang ditransmisikan sangat mudah untuk ditangkap orang lain dengan menggunakan packet sniffer atau yang lain.

Untuk simulasi SSH akan menggunakan aplikasi Putty yang merupakan aplikasi freeware.
Putty dapat didownload di Lab Sisjar ITTelkom (tempat saya praktikum :D) .::download::.


Install SSH pada Ubuntu Server 10.04

sebelum menginstal service SSH jangan lupa masukkan ISO installer Ubuntu Server ke Disc Drive setelah itu lakukan mounting ISO tersebut dengan syntax "apt-cdrom add /media.
Mount hanya dilakukan jika CD Drive / ISO belum bisa digunakan (Belum dikenali oleh ubuntu) 

 Memasukkan ISO sebagai CD Drive pada VMware
(Menu VM=>setting)
 Mounting ISO / CD installer

 Setelah berhasil melakukan mounting maka saatnya untuk melakukan instal service SSH
systaxnya "apt-get install openssh-server"
 Install SSH (Error)
Jika terjadi error seperti gambar di atas maka tambahkan syntax --fix-missing
"apt-get install openssh-server --fix-missing"

Hasil install SSH

Untuk file konfigurasi SSH sendiri ada di file "/etc/ssh/sshd_config"
untuk membukanya bisa menggunakan editor nano
"nano /etc/ssh/sshd_config"
Jangan lupa setiap selesai melakukan perubahan pada file konfigurasi ini untuk melaukan restart service dari SSH tersebut syntaxnya "/etc/init.d/ssh restart"

Sekarang lanjut agar ubuntu server yang sudah diinstall di vmware bisa diremote dari OS kita (OS untuk install VMware)
1. Setting IP Address Ubuntu Server 10.04
    file konfigurasinya ada di "/etc/network/interfaces" untuk mengeditnya bisa menggunakan editor nano "nano /etc/network/interfaces". Tambahkan / edit seperti gambar di bawah ini.
Sama seperti SSH atau service yang lainnya setelah melakukan konfigurasi maka restart servicenya. Untuk restart service networking syntaxnya "/etc/init.d/networking restart"

2. Setting IP pada VMNet8 pada OS kita
VMnet8 adalah Interface yang dipakai OS kita untuk berhubungan dengan VMware jika pada interface VMware kita setting dengan mode NAT.

3. Test Koneksi OS kita dengan OS yang kita install di VMware
Untuk test koneksi bisa menggunakan command ping (disini dari win XP)
Jika hasilnya reply from 192.168.1.1 (IP ubuntu server) maka Win XP telah berhasil terkoneksi dengan Ubuntu Server 10.04 yang diinstal pada VMware.
4. Test SSH dengan menggunakan Putty
192.168.1.1 adalah IP Address Ubuntu Server
8184 adalah port untuk SSH yang telah dikonfigurasi pada "ect/ssh/sshd_config" jika belum dikonfigurasi portnya tetap port 22
Klik Open

5. Hasil remote dengan Putty
Setelah tahap ini berhasil maka kita dapat mengkonfigurasi Ubuntu Server melalui putty seperti mengkonfigurasinya langsung pada VMware.

*kalau ada saran dan pertnyaan bisa komen.. hehehehe :D